Request an ssl certificate

Request a certificate via Certificate Manager
We've made applying for an SSL certificate easy at CertificateManager. First, you create an organizational account on the CertificateManager website. Once you're logged in to Certificate Manager, we'll need to create some items before we can apply for a certificate.
Step 1: Create a distinguished name
We need some information which should be included in the requested certificate such as:
- name
- O Organization
- OU Organization Unit
- L City
- ST State
- C Country
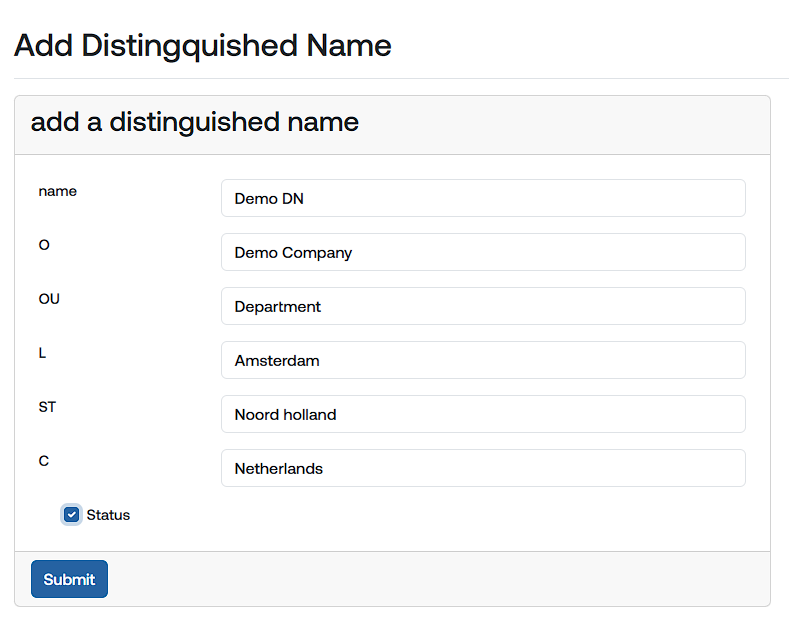
Please fill in the requested fields and click "submit"
We have now created a distinguished name that we can use and reuse every time we create a new CSR.
Step 2 Create Contact
We also have a contact form when applying for an SSL certificate. We create a contact form, which, like the disquished name, we can select each time we apply for an SSL certificate.
Several fields are requested; then click "Add contact." The email address is very important, as that's where all emails will be sent.

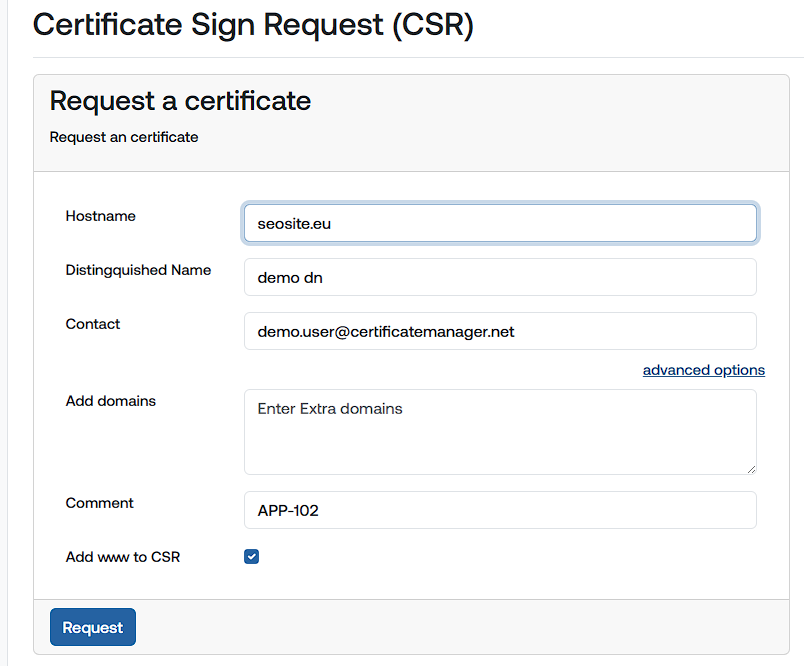
Step 3 Create CSR
We've now created a distinguished name and contact, and are ready to create a CSR. With this CSR, we can request an SSL certificate, which we can then install along with the private key.
- Enter the hostname for the certificate.
- Select the distinguished name.
- Select the contact.
- Click on advanced options.
- Enter any multiple domains.
- Enter a reference such as an order number or ticket number.
- If desired, select to have www added automatically.
Click on "Request." The CSR will now be generated along with a private key, which will be placed in the vault along with a password.
We've now generated a CSR and can link it to the desired SSL certificate.
Step 4 CSR overview
The CSR is now listed in the overview of all CSRs created in your account. Click "View" to view the CSR details and to continue the ordering process.

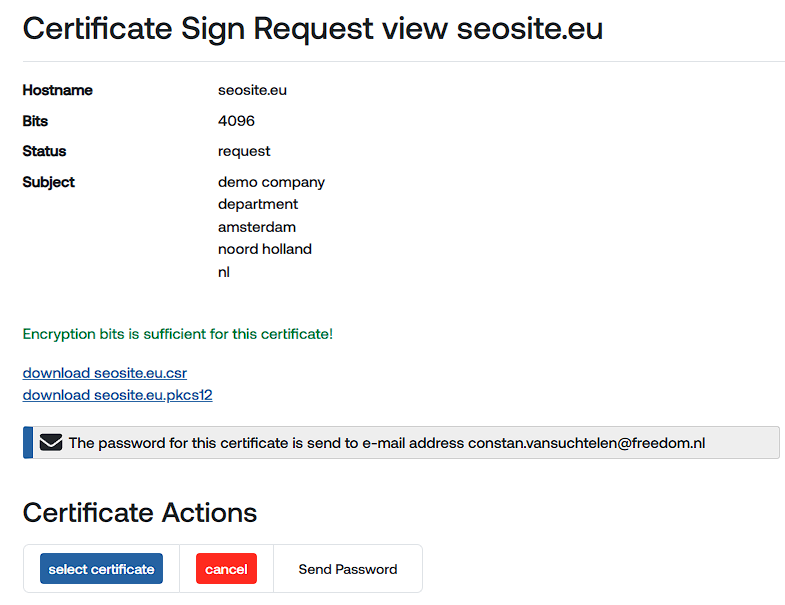
Step 5 view CSR status
We now see details of the CSR we created, including the following:
- hostname
- encryption used
- status
- and the subject of the CSR (DN)
You can now download the CSR and the private key and have the private key password emailed to the email address provided in the notification.
Click "Select certificate" to begin the ordering process for this CSR. To successfully complete the ordering process, you must have sufficient funds in your account.
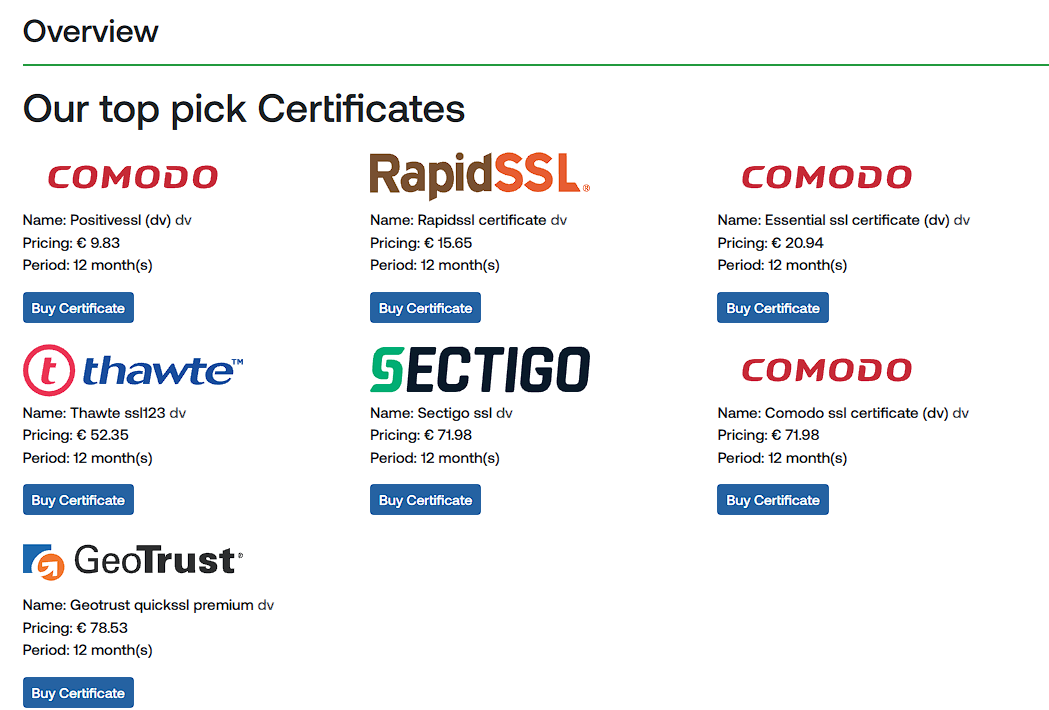
Step 6 select the certificate
You'll now see an overview of all the certificates we can offer you on this CSR. Select the certificate you want by clicking "Buy certificate."
Step 7 Purchase Options
The options for your chosen certificate are now visible. First, select the CSR you want to purchase this certificate for. You can purchase certifcates for multiple CSRs at once.
Select the certificate validity period; a longer period is usually more cost-effective. Select the desired number of certificates (usually one). If you want us to install the SSL certificate for you, select the "want us to install" field. Select any options and then click the "add cart" button.
The certificate is now in your shopping cart, ready to be purchased. You will be automatically redirected to your shopping cart.

Step 8 Shoppingcart
The shopping cart displays an overview of the selected purchase options. You can see the order status, supplier, selected certificate, and price. Click "Check Order" to review the order before purchasing.

Step 9 check order
Three columns display the details of your order for each selected certificate. Please check these details carefully! If the order details are correct, click the "Buy Certificate" button. The certificate will now be requested from the relevant CA. This may take a few seconds.

Step 10 domain validation
The certificate has been requested but is not yet active. First, we need to prove that we own the domain for which we are requesting the SSL certificate. This can be done using various methods, but in this guide, I will use DV (Domain Validation).
In the CSR overview, click on the CSR for which we requested the certificate and click the "status" button.
We will see which DNS settings we need to configure to activate the SSL certificate. Add the requested records to your domain name's DNS. We will continuously check whether the records have been added and then notify the CA so they can perform the check.
Once the CA approves the DNS settings, the SSL certificate will be created and downloaded to Certificate Manager. You can view and download the certificate in the "certificate overview."

Step 11 download certificate
The certificate is ready for use and is available in Certificate Manager. Click "View" to see all the certificate options. Download the certificate by clicking the link hostname.crt. Download the private key by clicking download hostname.pfx.
Auto Renew
You can choose to enable automatic renewal for this certificate. We will then automatically repeat the above steps when the certificate expires. The CSR will then be ready, all that remains is the domain validation check and the certificate download.
Certificaat options
If a certificate is active, you can perform various actions for this certificate
Revoke
If a private key is compromised, the certificate must be revoked. The certificate is then declared invalid.
Renew
If you want to renew a certificate because it's about to expire, click "renew." A new CSR will then be automatically generated with the information already on file, and the certificate will be requested from the CA. This is not necessary if you choose automatic renewal.
Reissue
Sometimes you'll want to reissue a certificate, perhaps if the encryption is outdated and needs to be renewed. Reissue is also possible if you want to add or remove a hostname. Issuing a certificate doesn't change its validity period.
Export
Export all certificate data in JSON format including private key and password
Archive
If you don't want to renew the certificate or it's no longer needed, you can choose to archive it. Archiving it will remove the certificate from Certificate Manager. You will also no longer receive notifications about the certificate.
Cancel
Cancel the certificate, upon cancellation the certificate will also be automatically "revoked".
Send password
Send the private key password via email to the email address provided in the notification.